(日本人)
Build a Sumo Model 
-
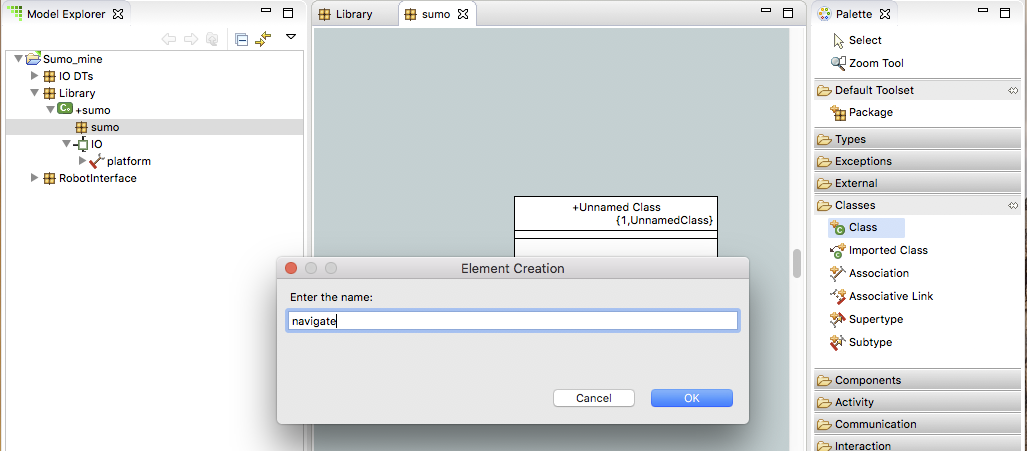
Create package sumo under component sumo
-
Double-click package sumo to open it on the canvas
-
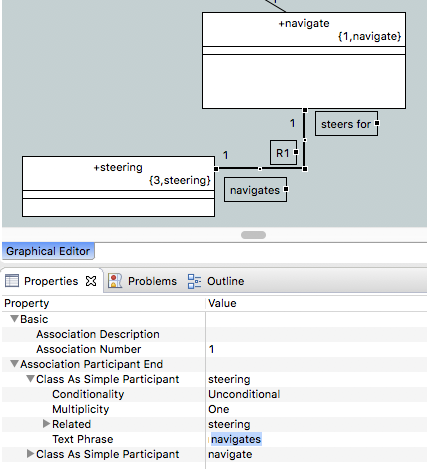
Use the Palette > Classes > Class tool to create a class on the canvas. Name it navigate
-
Create class drive
-
Create class steering
-
Click the Association tool in the Palette and drag between navigate and steering on the canvas to draw an association
-
Click the Association tool in the Palette and drag between navigate and drive on the canvas to draw an association
-
Select the association R1 and then open the Properties view
-
Expand Association Participant End
-
Expand Class As Simple Participant for steering
-
Set the Text Phrase field to navigates
-
Expand Class As Simple Participant for navigate
-
Set the Text Phrase field to steers for
-
You can drag the phrases around on the canvas to reposition them and use the bendpoints on the association line to add turned segments to the line
-
-
Select the association R2 and then open the Properties view
-
Expand Association Participant End
-
Expand Class As Simple Participant for drive
-
Set the Text Phrase field to directs
-
Expand Class As Simple Participant for navigate
-
Set the Text Phrase field to motivates
-
-
Right-click on navigate and select New > Attribute. Name the attribute retreat_duration
-
Right-click on navigate and select New > Attribute. Name the attribute target_duration
-
Right-click on drive and select New > Attribute. Name the attribute speed
-
Right-click on drive and select New > Operation. Name the operation forward
-
Right-click on drive and select New > Operation. Name the operation reverse
-
Right-click on drive and select New > Operation. Name the operation stop
Submitting Your Assignment
-
Take a screenshot of your BridgePoint with Model Explorer view expanded to show all the elements you have just created.
-
Open the BridgePoint support issue you created in homework 1.1.
-
Edit the issue, scroll down to the Edit field:
-
Change the Status to "Feedback"
-
Change the Assignee to "cstarrett"
-
Add a Note that this assignment is completed
-
Use the Choose Files button to attach your screenshot
-
-
Click the Submit button
You are now ready to proceed to the next step